 I don’t know about you, but when I read something like “One of the most interesting novelties that the home craftsman can make in his leisure moments is an electric ‘Aladdin’s lamp,'” I feel obligated to make a lamp. This is one of the earliest Popular Mechanics projects we’ve done so far, coming in from the June 1926 issue. Even if you don’t have a mantle to put it on (as the article suggests) it makes a great nightlight, especially for kids who dream of being a princess/genie/street urchin.
Step 1: Cut out Your Pieces
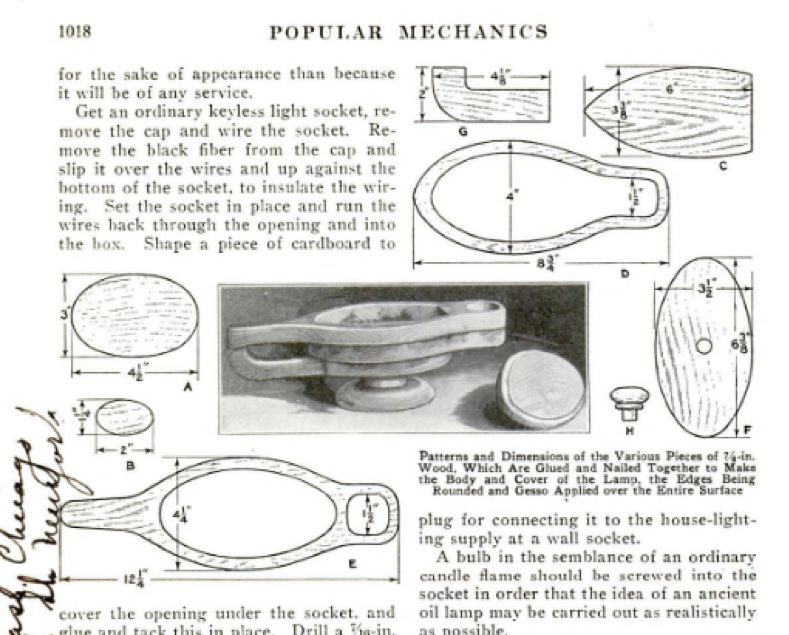 If you’re feeling intimidated by this project, keep in mind that it is far more an art project than a woodworking one. The article shows the rough dimensions you need for each of the wood pieces and recommends using 7/8 inch white pine and a coping saw, though if you have a band saw it will be much easier. They don’t specify how to do the angles on your curves, but it doesn’t really matter as long as you like the shape and keep it consistent. Here are the pieces you’ll need:
- (A) Oval, 3 in. wide and 4.5 in. long. You’ll need to round off the upper edge withe a knife or file so it looks more like its brass counterpart.
- (B) Small oval, 1.25 in. wide and 2 in. long.
- (C) Lamp bowl base, 3 and 3/8 in. wide and 6 in. long, curved to a point on one end (see diagram). One edge of this piece will also need to be rounded, to serve as the curving bottom of the lamp bowl.
- (D) Middle bowl piece, 4 in. wide by 8.75 in. long. You’ll need to look at the diagram for this piece, as it is rounded on both ends with a square jutting out for the bulb. You’ll also want to round the bottom edge.
- (E) Top bowl piece, 4.25 in. wide by 12.25 in. long. This piece includes the hole for the bulb and the top of the handle (see diagram). Both the upper and lower edge should be rounded.
- (F) Oval lid, 3.25 in. wide by 6 and 3/8 in. long. The top edge should be significantly rounded, while the bottom edge should have a 1/4 in. groove so it sits down in the lamp bowl.
- (G) Bottom half of handle, 2 in. wide by 4 and 1/8 in. long, cut in a “j” shape to meet the top and base of the bowl. Round the edges.
- (H) Knob. Pick any sort of knob you like, or turn one.
Step 2: Assemble the Wood Pieces
Once you have all your pieces cut out, assemble the wood housing for the lamp.
- With the rounded side of piece (A) up, glue and nail the oval (B) directly in the center.
- Glue and nail piece (C) in the center of (B), with the rounded side down.
- Attach (D) and (E) in the same way, with the rounded side of (D) down.
- Attach the bottom half of the handle, (G), to (E) and (C).
- Glue knob (H) to lid (F) and set aside.
Step 3: Channel Your Inner Electrician
Electricity still seems like magic to me most of the time, but Gordon seems to understand it. You’ll need to wire and install a light socket in the front of the lamp with a plug coming into the bowl and out through a small hole in the base. You can decide where you want it to come out and drill a hole.
Gordon also decided to add a strip of touch wire around the outside of the lamp to turn it off and on. This really adds to the magic, since know when you rub the lamp, the light turns on. This isn’t in the original instructions, but I think it is a necessary addition if you really want a genie lamp.
We used an old-fashioned candle bulb for the lamp to give it the appearance of flame. This also keeps it dim enough to serve as a great night light. You can pick whatever bulb you like best.
Step 4: Finish and Paint
You can now finish the lamp to your liking. The article suggests putting a layer of gesso (plaster) over the whole thing to round everything out and make it look like cast brass. You can also do more filing to shape the wood if you’d like. Then pick a color and paint the lamp and lid.
We were especially excited about this build when we went to Disneyland in May and they were gearing up for the Aladdin release. We found inspiration everywhere.
Lego Aladdin:

Magic Carpet and Lamp:


So if the Disney advertising is working on your children as well as it did on us, this build can be a great way to get an Aladdin souvenir without actually having to go to California.
Overall, here is the rating:
Exactness of Instructions: 7/10
Unless, of course, you don’t know how to wire up a light socket (which apparently all 1926 PM readers already know how to do, and according to Gordon, so should you), in which case it is more like 5/10. Once you embrace that this is an art project, not a woodworking project, you will realize any instructions that seem to be missing are really just left up to your artistic interpretation.
Ease of Build: 8/10
The whole thing only requires pretty basic skills. Again, except for the wiring bit if you’ve never done it. But with some lamp wire from Lowe’s and a couple YouTube videos, you’ll be fine.
Relevance: 7/10
As a genie lamp, this is pretty fun. The touch wire adds a bit of magic, and if your child helps you with any part of the process, they’ll feel attached to and proud of it. But even worst case scenario, you’ve made a perfectly functional lamp.

